
Hardware
We've provided a set of hardware design tools that enable you to implement a wide variety of behavioral experiments using inexpensive and easy-to-use components. These are generally more on the level of a high-school student than computer science PhD level. So don't feel intimidated when you see lots of wires, resistors, etc. We've tried to keep the learning curve simple, so that you can actually learn about electronics in the process of using them for your experiments.
The main hardware device consists of the OpenMaze "shield" which is a simple printed circuit board (PCB) that makes it really easy to plug a wide range of different components useful for animal behavior into an arduino.
Arduino
What kind of hardware do I need?
This is the first question to think about it designing a new experiment. At OpenMaze, most of our projects are designed around the Arduino, a low-cost microcontroller that allows you to write simple code to control the Arduino's inputs and outputs.
The Arduino is the best choice for most behavioral experiments, because it's cheap, easy to use, and has a huge online community supporting it. You can easily connect motors, water valves, touch detectors, speakers, and even amplifiers to an Arduino, and easily find code online to utilize diverse electronic components.
Step 1: Get an Arduino

An Arduino is small microcontroller board that costs about $20. This is a basically a circuit board, about the size of a deck of cards, with a microprocessor (a sort of tiny computer) and a fair number of digital and analog inputs and outputs on it. It also has a USB port so you can connect it to your computer, in order to program it or to get data from it.
This is probably the way you want to start out for most experiments. The Arduino is flexible and powerful enough to deliver auditory or tactile stimuli and collect behavioral responses, such as lever presses, touches, or even licks.
See our Software section when you're ready to start programming the Arduino.
Step 2: Build a shield
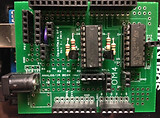
To connect all of the hardware you'll be using, you'll need to build a little "shield" that stacks on top of the main Arduino board. The shield contains supplementary circuitry and input/output connectors. We've designed a family of shields that are flexible enough to accomodate many different paradigms.
To build it, you can print the circuit board for one of the OpenMaze (OM) shields, printed by a board manufacturing company, and solder on the necessary components. For most experiments the total cost of this is less than $25.
Continue to our Shields page for more info on how to build the shield.
Step 3: Attach your components

Finally, connect all the components you need. These can be motors, touch detectors, or speakers. We've designed the system to be modular so that you add as many of each device as you need!
Continue to the Components page to read more about what's available.
Raspberry Pi, and other System-on-a-Chip (SoC) computers

In neuroscience terms, arduino is like the spinal cord. It forms a very short loop between input (an animal's actions) and output (behavioral feedback). This loop is rapid and stereotyped.
Similar to the mammalian nervous system however, there are limitations to the processing capacity of this low-level substation, so as for the cortex, behavioral control systems often need high-level interaction, such as with a computer.
For some projects that require a little more processing power (such as processing or generating video) it is best to turn to SoC computers such as the Raspberry Pi or Beaglebone Black. These are basically tiny Linux computers that are easily integrated into behavioral setups and controlled via a remote interface. In contrast to many other similar boards, the RaspberryPi also has a built-in GPU chip which allows hardware acceleration of CPU intensive tasks such as video display. Along with the huge amount of community development dedicated to RasPi, this makes it probably the best choice for developing behavioral apparatus. Please see our page for setting up PsychoPy for visual stimulus display on the RaspberryPi 3B.